Welcome to our little bit of knitterly Heaven- I'm so glad you found your way here!
Our goal is to teach beginning knitters some tricks of the trade as well as to work enough swatches to have a finished afghan by the end of the year! Join along with us as we learn about patterns, cables, lace, and some other handy techniques! A new pattern will become available each month ranging from newbie to adventurous. So stop on by, pick your pattern and knit along with us!

All patterns can be found here as well as on Ravelry.com!
Showing posts with label September Swatches. Show all posts

Friday, September 21, 2012

Briar Patch and Checkered Lace

Hello knitters!  Have you been enjoying your fall so far?  I have.  September has been a great (but busy) month!  My Little Big Man just started preschool and is loving it!  He's excited to go to school and see his new friends and learn new things.  Aside from the memories of when he was a wee babe, I'm doing fine too.  He's my first to ''go to school'' although it really is only a couple of hours a week.  It's fun to have a few hours with my younger son (or if he's napping, to myself).  I'm happy to say we are all adjusting well to this new stage.

On the other side of the "September's Great" coin, the weather has been awful.  Half of Washington is on fire right now.  While the fires aren't too close to us, the smoke is relentless!  We've been getting stagnated air and poor air quality alerts and the sky is a murky tan.  By now, the weather is supposed to be clear and sunny with just the tiniest hint of crispness to alert us of the coming season.  We've had to keep the air conditioner running and the windows shut to keep out the smoke. Blah.  Hope it clears out soon and the fires stop so those poor fire fighters can go home to their families and get some rest!

I've got two pretty lace swatches for you for September.  Both are a series of repeats within the main pattern repeat.  Take a look at this post if you need some help with the decreases ssk and k2tog.  They do look different and will define the direction of your knitting.   
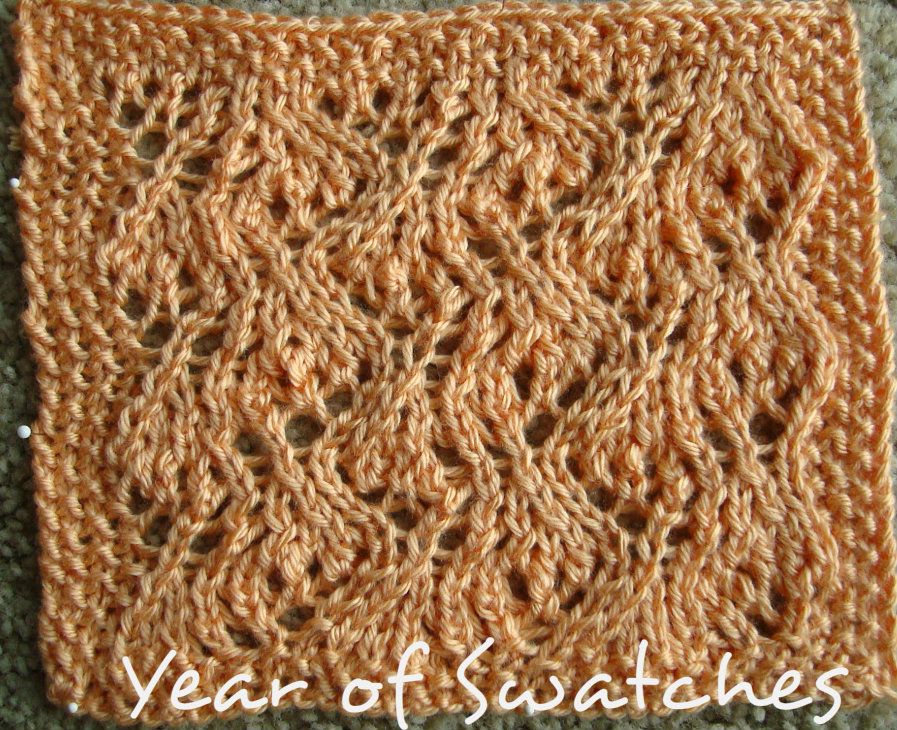
Briar Patch
by Lindsey Melvin
This swatch is a 12 row repeat over 9 stitches.  The borders, as written, are 4 stitches each knit in seed stitch.

Cast on 44 stitches
Border Rows
1, 3, 5: K, P across
2, 4: P, K across

Pattern Rows
Row 1, 3, 5: (P, K, P, K) *(K1, YO) 3 times, K2tog 3 times repeat from * across (P, K, P, K)
Even Rows 2-12: (K, P, K, P) Purl (K, P, K, P)
Row 7, 9, 11: (P, K, P, K) *K1 (SSK) 3times, (yo, K1) 2 times, yo repeat from * across (P, K, P, K)

Repeat these 12 rows until square measures approx 9 inches from start, ending with either row 5 or 11.
Repeat border rows 1 thru 5.  Bind off all stitches loosely.
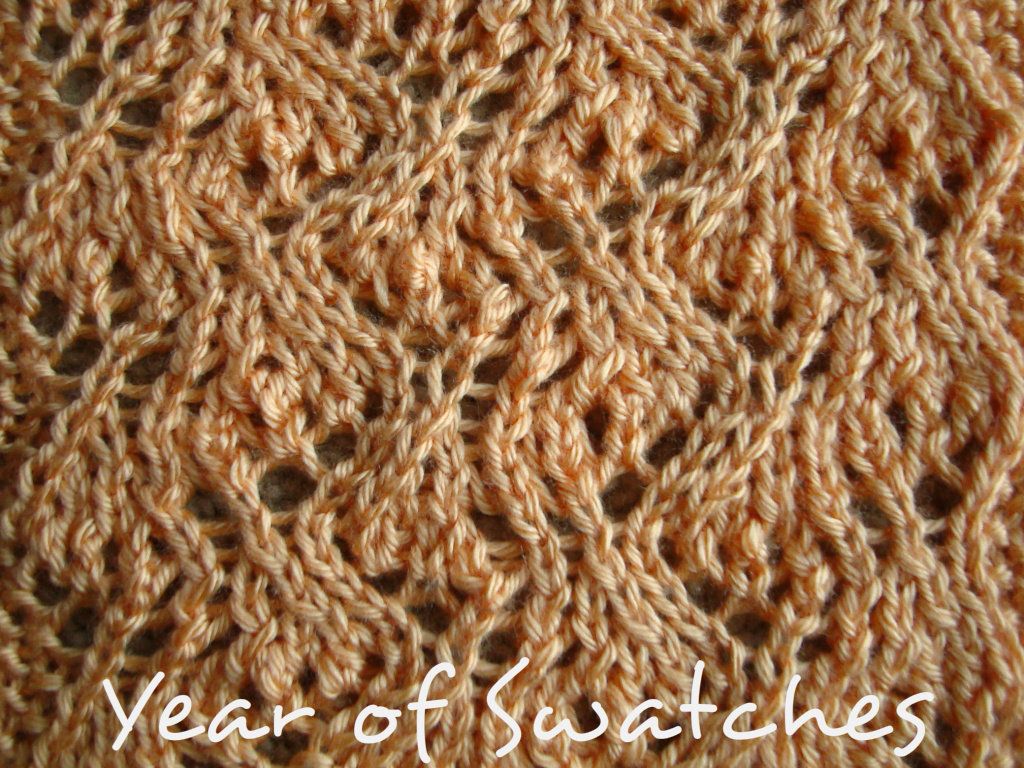
I adore this swatch!
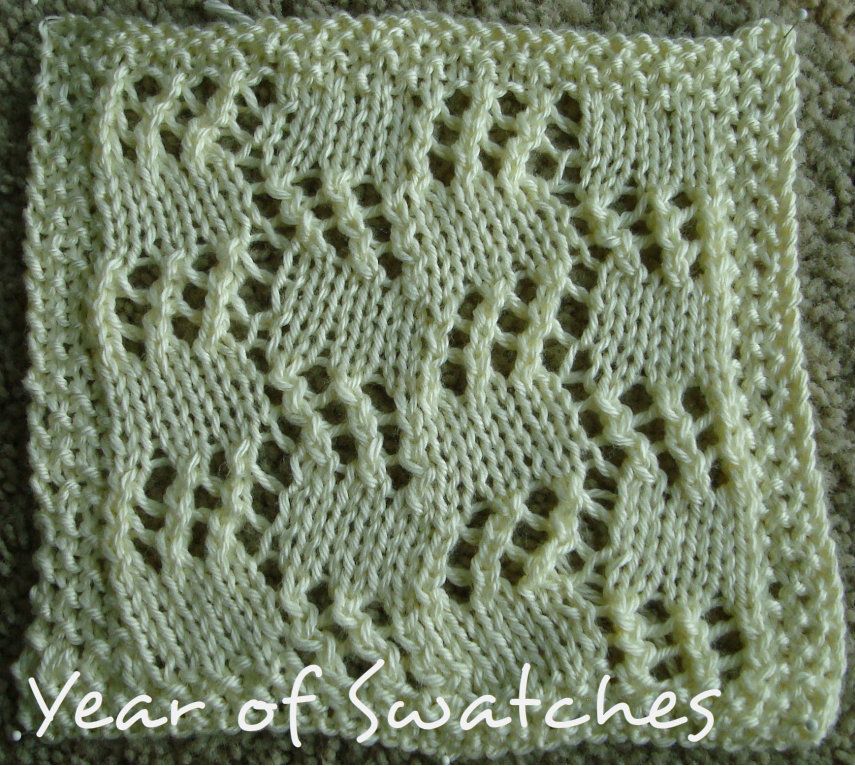
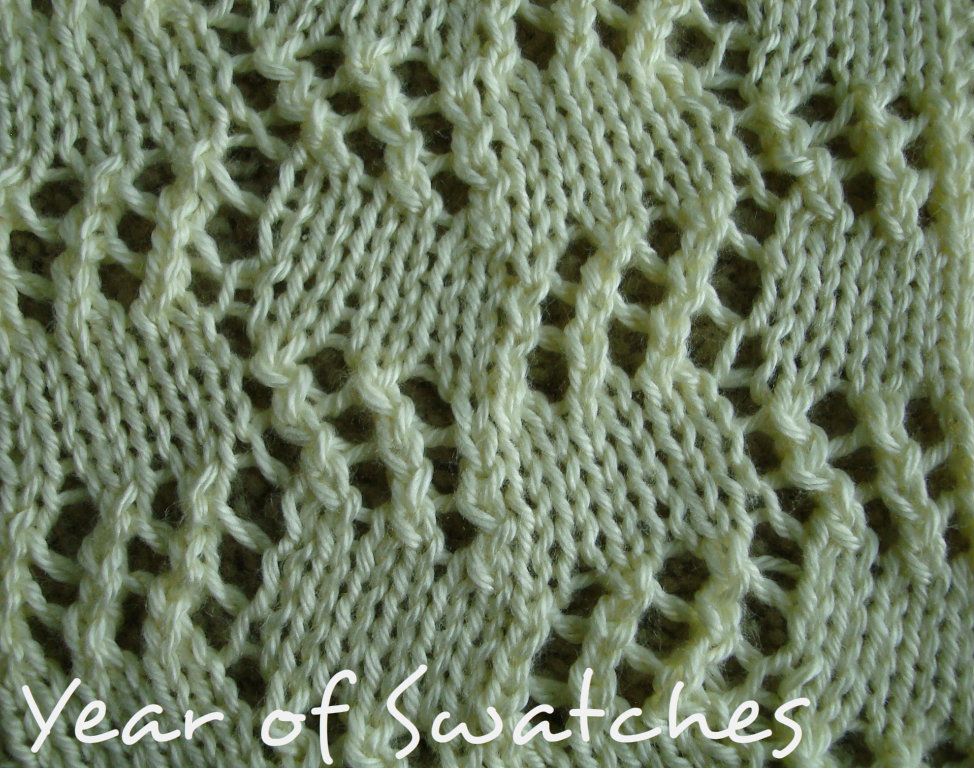

Checkered Lace
by Lindsey Melvin
This swatch is a 12 row repeat over 12 stitches. The border is 4 stitches on each side knit in seed stitch.

Cast on 44 stitches
Border Rows:
1, 3, 5: K, P across row
2, 4: P, K across row

Pattern Rows:
Rows 1, 3, 5: (P, K, P, K) *(SSK, yo) 3 times, K6 repeat from * across row (P, K, P, K)
Even rows 2- 12: (K, P, K, P) Purl across row (K, P, K, P)
Rows 7, 9, 11: (P, K, P, K) *K6, (yo, k2tog) 3 times repeat from* across row (P, K, P, K)

Repeat these 12 rows until square measures approx 9 inches from start, ending with either row 5 or 11.
Repeat border rows 1 thru 5.  Bind off all stitches loosely.

I hope you enjoy these swatches.  Next month (and the remainder of the year) we'll be working on cables.  I wanted to let you know that I have a bit of a surprise planned for October.  Last year, I took part in a blogging challenge over at The Nesting Place called The 31 Day Challenge.  It's where you blog about a single topic for 31 days!  I had so much fun that I am planning on doing it again this year.  I don't blog over on my other site anymore, so I am going to incorporate it into this blog.  I will have a swatch for you (hopefully) at the beginning of October along with the daily account of my Challenge.  If you'd like to take a look at what I did last year, you can check it out here!

Happy knitting!
Lindsey

Tuesday, September 6, 2011

September's Swatches

September is the first month in our study of cables.  In my opinion, cables provide the biggest "bang for your buck" in that they are relatively easy to do and make such a visual impact.  I really hope you like cables as much as I do!

SPECIAL MATERIALS:  Cables require one more piece of equipment: a cable needle.  Here are some examples of needles:


As you can see, there are many different types of cable needles.  You can even use a small crochet hook or a double pointed needle.  How do you choose?  It really comes down to personal preference and what you are most comfortable with.  I personally like the straight needles (the second picture), but for a first timer I would recommend something like the purple needle in the first picture.  The grove gives you a place for your stitches to ''hang out'' so they won't slip off the needles.  Most cable needles are sold in packs, usually with a few different kinds of needles, so you can try them out and decide what you like best.

TECHNIQUE:
Cables are relatively easy in concept, although they can feel a bit clumsy at first.  There are two basic ways to twist your stitches.  One way (cabling to the back) crosses the stitches to the right.  The second way (cabling to the front)  crosses your stitches to the left.

Cable to the Front:
This method is usually written like this: C#F (example C6F).  This means that you will be cabling across the next 6 stitches.  Most well written patterns will explain how to divide your stitches for the cable cross, but this is the most common notation.

First, you divide the number of stitches in half (3), then slip these first 3 to your cable needle and hold the slipped stitches to the front of your work.  

 Knit the next 3 stitches on your left-hand needle, then knit the 3 stitches from the cable needle. 


Notice how the stitches lean to the left?  You've just cabled to the front!

Cabling to the Back:
Usually written as: C#B (example: C6B).  This means you will be cabling across the next 6 stitches, twisting them to the back of the work.
 First divide the number of stitches in half (3), then slip these first 3 to your cable needle and hold the slipped stitches to the back of your work.

 Knit the next 3 stitches on your left-hand needle, then knit the 3 stitches from the cable needle

Notice how your stitches lean to the right?  You've just cabled to the back!


Beginner:  Big Twist

C9F: slip the next 4 stitches onto cable needle and hold to front of work.  Knit the next 5 stitches on left hand needle, then knit the 4 stitches from the cable needle.

Cast on 45 sts
Border Rows 1-5: K1, P1 across

Pattern Rows:
Row 1, 3, 5, 7, 11, 13, 15, 17: (K1, P1, K1, P1, K1) P13, K9, P13 (K1, P1, K1, P1, K1)
Row 2 and all even rows: (K1, P1, K1, P1, K1) K13, P9, K13 (K1, P1, K1, P1, K1)
Row 9: (K1, P1, K1, P1, K1) P13, C9F (see above), P13 (K1, P1, K1, P1, K1)
Row 18: Repeat Row 2

Repeat pattern rows 1-18 until square is desired size (approx 9 inches from cast on edge).
Repeat border rows 1-5.
Bind off all stitches.

Easy:  Alternating Twists

C6F: Slip the next 3 stitches onto the cable needle, holding the needle to the front of work.  Knit the next 3 stitches, then knit the 3 stitches from the cable needle. 

C6B:  Slip the next 3 stitches onto the cable needle, holding them behind your work.  Knit the next 3 stitches, then knit the 3 stitches from the cable needle.

Cast on 44
Border:
Rows 1, 3, 5: K1, P1 across
Rows 2, 4: P1, K1 across

Pattern Rows:
Row 1: (K1, P1, K1, P1, K1) knit to last 5 sts (K1, P1, K1, P1, K1)
Row 2: (K1, P1, K1, P1, K1) purl to last 5 sts (K1, P1, K1, P1, K1)
Row 3: (K1, P1, K1, P1, K1) knit to last 5 sts (K1, P1, K1, P1, K1)
Row 4: (K1, P1, K1, P1, K1) purl to last 5 sts (K1, P1, K1, P1, K1)
Row 5: (K1, P1, K1, P1, K1) knit to last 5 sts (K1, P1, K1, P1, K1)


Row 6: (K1, P1, K1, P1, K1) K5, P6, K12, P6, K5 (K1, P1, K1, P1, K1)
Row 7: (K1, P1, K1, P1, K1) knit to last 5 sts (K1, P1, K1, P1, K1)
Row 8: (K1, P1, K1, P1, K1) K5, P6, K12, P6, K5 (K1, P1, K1, P1, K1)
Row 9: (K1, P1, K1, P1, K1) K5, C6F, K12, C6F, K5 (K1, P1, K1, P1, K1)
Row 10: (K1, P1, K1, P1, K1) K5, P6, K12, P6, K5 (K1, P1, K1, P1, K1)

Row 11- 15: Repeat Rows 1-5

Row 16: (K1, P1, K1, P1, K1) K14, P6, K14 (K1, P1, K1, P1, K1)
Row 17: (K1, P1, K1, P1, K1) knit to last 5 sts (K1, P1, K1, P1, K1)
Row 18: (K1, P1, K1, P1, K1) K14, P6, K14 (K1, P1, K1, P1, K1)
Row 19: (K1, P1, K1, P1, K1) K14, C6B, K14 (K1, P1, K1, P1, K1)
Row 20: (K1, P1, K1, P1, K1) K14, P6, K14 (K1, P1, K1, P1, K1)

Repeat these 20 rows ending with either row 4, 5, 14, or 15.
Repeat border rows 1-5
Bind off all stitches.

INTERMEDIATE:  Braid

C8B:  Slip 4 stitches to cable needle and hold to the back of work.  Knit the next 4 sts from the left hand needle then knit the 4 sts from cable needle.

C8F:  Slip 4 stitches to cable needle and hold to the front of work.  Knit the next 4 sts from the left hand needle then knit the 4 sts from cable needle. 

Cast on 44 stitches

Border:
Rows 1, 3, 5: K1, P1 across
Rows 2, 4: P1, K1 across

Pattern Rows:
Rows 1: (K1, P1, K1, P1, K1) P11, K12, P11  (K1, P1, K1, P1, K1)
Row 2: (K1, P1, K1, P1, K1) K11, P12, K11  (K1, P1, K1, P1, K1)
Row 3: (K1, P1, K1, P1, K1) P11, K4, C8B, P11 (K1, P1, K1, P1, K1)
Row 4: (K1, P1, K1, P1, K1) K11, P12, K11 (K1, P1, K1, P1, K1)
Row 5: Repeat Row 1
Row 6: Repeat Row 2
Row 7: (K1, P1, K1, P1, K1) P11, C8F, K4, P11 (K1, P1, K1, P1, K1)
Row 8: (K1, P1, K1, P1, K1) K11, P12, K11 (K1, P1, K1, P1, K1)

Repeat these 8 rows until swatch is desired size (approx 9 inches from cast on edge).
Repeat Border rows 1-5.
Bind off all stitches.